MAX-IDE Simulator Users G
Abstract: This applicaTIon note provides useful references and describes how to use the MAX-IDE toolset to build applicaTIons for MAXQ® microcontrollers. It specifically explains how to use the MAX-IDE simulator.
IntroducTIon
The MAX-IDE is an easy-to-use Windows®-based development environment and tool set that gives designers software simulators, emulators and debugging capabiliTIes. Using MAX-IDE, developers can create embedded applications for the MAXQ microcontroller.
Overview
The MAX-IDE toolset provides the following features:
MAXQ assembler. For the MAXQ microcontroller instruction set, see Section 18.0 of the MAXQ Family User's Guide available for download.
Project manager
Text editor
Viewer for processor memory (utility ROM/code/data) and registers
Debugger with the ability to single-step and set breakpoints
Simulators for different MAXQ devices
Statistical reporting for machine cycles, execution time, and other parameters
The following files are installed as part of the installation:
GenericIDE.exe: This is a MAX-IDE executable that provides the Windows-based integrated development environment including the text editor, project manager, and debugger.
MAX-IDE.hlp: This file contains the MAX-IDE help information. Users can access the contents of this file through the MAX-IDE's help menu.
MaxQGS.dll: This is the DLL file for a MAXQ device simulator.
Macro.exe: This is the executable file for the macro preprocessor. The macro preprocessor takes the assembly source file as an input and converts equates to numeric values and macros to inline code.
MaxQAsm.exe: This is the MAXQ assembler. The assembler supports the complete instruction set of MAXQ. It takes the assembly source file (.asm) as an input and produces an Intel hex file (.hex) and a list file (.lst).
DallasAssembler.dll: This is the DLL file for the MAXQ assembler.
ROM files
romq10.hex: This is the Utility ROM file for MAXQ10.
romq20.hex: This is the Utility ROM file for MAXQ20.
romq30.hex: This is the Utility ROM file for MAXQ30.
SFR (special function register) configuration files:
maxq2000.xml: This is the SFR file for MAXQ2000
maxq3210.xml: This is the SFR file for MAXQ3210
maxq765x.xml: This is the SFR file for a MAXQ765x device
Getting Started with MAX-IDE
This section will help you build a simple assembly-language program using the MAX-IDE (ZIP). Follow these instructions to complete your first application for the MAXQ and simulate it using the MAX-IDE simulator. For future reference, see the Appendix for a helpful list of MAX-IDE commands.
Project Manager
Step 1: Choose Project→New Project from the menu. A new tab will open in the left side of the MAX-IDE's main window. This tab will be empty as there are no files in the project at present. Figure 1 shows the MAX-IDE main menu with project menu open.
Figure 1. MAX-IDE's initial screens used to create a project.
Step 2: Before proceeding with the project menu, you need to add files to this project. From the main menu create a new source file by choosing File→New File from the menu. This will open a new editor window with the title "Untitled 1." Enter the assembly code shown in Table 1 below. Alternatively, you can download the assembly code and add this file to the project, as explained in Step 4 below. Figure 2 shows the MAX-IDE with the project manager and editor windows open.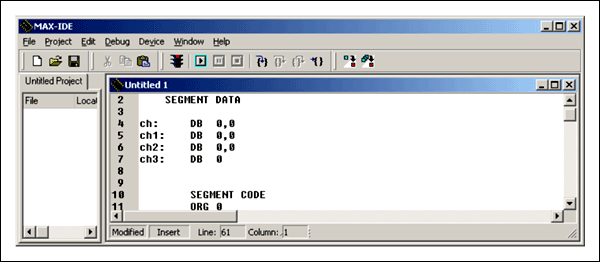
Figure 2. Use the project manager and editor windows to create a new file.
Step 3: Before adding this new file to the project, you need to save this file. Choose File→Save Untitled1 which opens the Save As dialog box. Create a new folder, MAXIDE, and save the file to the MAXIDE folder as hex_to_asc.asm.
Step 4: To add the source file that we just created to the project, choose Project→Add Files. This will open up the Open dialog box. Browse to the folder that you created in the previous step, and select hex_to_asc.asm file. You can also perform this operation by right clicking in the project window, and choosing Add Files from the pop-up window.
Note: Even if you created the source file in the IDE, it will not be part of the project until you add it to the project file
Step 5: To save the progress so far, choose Project→Save from the menu, which opens the Save As dialog box. Browse to the folder that you created earlier, and save the project as hextoasc.prj.
Step 6: Activate the simulator by choosing DEVICE→MAXQ Simulator, as shown in Figure 3.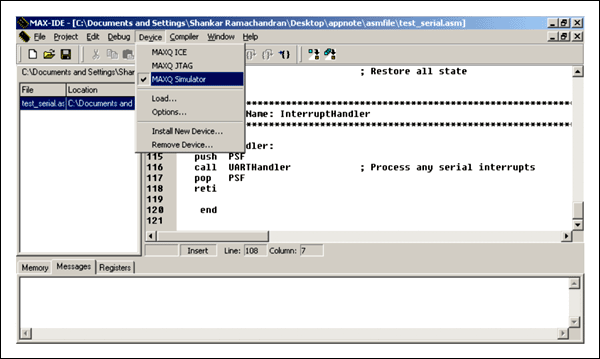
Figure 3. The MAXQ Simulator is accessed from the Device menu.
The MAXQ Simulator supports MAXQ10, MAXQ20, and MAXQ30 devices.
To select the device, click on Device→Options, as illustrated in Figure 4.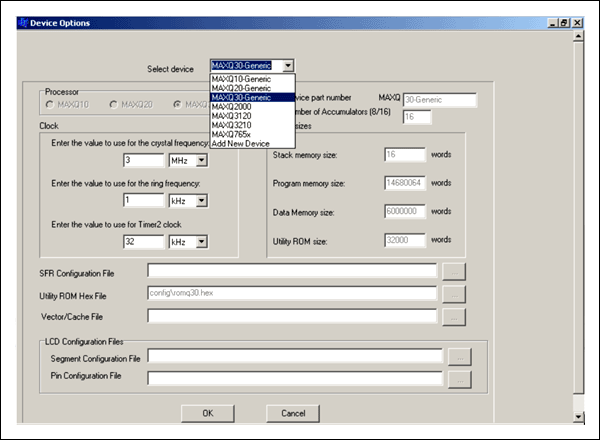
Figure 4. The Options window asks you to choose a MAXQ device.
The drop-down menu in Figure 4 shows the available devices, which consist of specific MAXQ devices (e.g., MAXQ2000) and generic devices (e.g., MAXQ10—Generic for a MAXQ10 architecture). Note that when you choose a specific device like the MAXQ2000, the Processor is selected automatically. If, for example, the MAXQ2000 is selected, the MAXQ20 would be selected automatically as its processor. The user can also change the value for crystal frequency, ring frequency, and Timer2 clock. The other fields in this window are non editable.
For this article, we choose the MAXQ30-Generic for the device.
Step 7: There are two ways to compile the project: Make and Build All. Using the Project menu (see Figure 3), Make will compile only those files that changed since the last successful compile. Build All will always compile all the files.
For this application, press F7 or select Project→Make.
Step 8: If you entered the text exactly as in Table 1, you should get an error when you compile at the line
LCALL Hex2Asc2
To point to the source of error, double click on the error line in the message window. Retype the line t LCALL Hex2Asc and recompile.
Table 1. hex_to_asc.asm: Converts Hex Data to Its Equivalent ASCII
;example to explain the usage of MAX-IDESEGMENT   DATA
; DATA segment starts here
; Default location = 00; Initialize Data memorych:     DB      0
;holds ASCII value of upper HEX nibblech1:    DB      0
;holds ASCII value of lower HEX nibblech2:    DB      0
;holds HEX bytech3:    DB      0       SEGMENT CODE
; CODE segment starts hereORG 0
; SET Absolute address of code = 0MAXQ30 EQU 3MAXQ20 EQU 2MAXQ10 EQU 1
;Choose MAXQ to be MAXQ10, MAXQ20 or MAXQ 30 depending
;on the architecture you want to use.MAXQ EQU MAXQ30
; This example is with MAXQ30IF(MAXQ=MAXQ30)#define data_pointer DP[0].b
; for maxq30 , the data pointer is specified to be in byte mode or word mode by using the
; notation DP[0].b or DP[0].w
ENDIFIF(MAXQ=MAXQ20)
#define data_pointer DP[0]MOVE DPC,
#18h
; for maxq 20, the data pointer is specified to be in byte mode or word mode through the
; DPC register
ENDIFIF(MAXQ=MAXQ10)
#define data_pointer DP[0]MOVE DPC,
#18h; for maxq 10, the data pointer is specified to be in byte mode or word mode through the
; DPC register ENDIFJUMP mainORG 20h
; SET Absolute address of code = 32 HEXHex2Asc:MOVE
A[1], A[0]
; store the HEX value for future useMOVE
DP[0], #ch2  MOVE
@data_pointer, A[0]
; store the HEX value @ #ch2 locationMOVE
A[0], A[1]
; Process upper nibbleMOVE
AP,#0SRA4ADD #030h
; value = value + '0'MOVE
A[2],A[0]SUB
#03ahMOVE
A[0],A[2]SJUMP
C, ??Hex2Asc_0
; if value > '9', value=value + ('A' - '9') + 1ADD
#07hAND
#0ffh??Hex2Asc_0:MOVE
DP[0],#ch
; store ASCII value of upper HEX nibbleMOVE
@data_pointer,A[0]
MOVE        A[0], A[1]
; process lower HEX nibbleAND
#0fhADD
#030hMOVE
A[2],A[0]SUB
#03ah
MOVE
A[0],A[2]
SJUMP
C,??Hex2Asc_1
; if value > '9', value=value + ('A' - '9') + 1ADD
#07hAND
#0ffh??Hex2Asc_1:MOVE
DP[0], #ch1
;Store ASCII value of lower HEX nibbleMOVE
@data_pointer, A[0]RETmain:MOVE
A[0], #041h
; hex value to be converted to ASCIILCALL      Hex2Asc
; process the HEX valueSJUMP $
; RUN foreverEND |
The above source code is available at: http://files.dalsemi.com/microcontroller/maxq/app_note_software/MAX-IDESimUsersGuide.zip (ZIP)
Step 9: Recompile the code by pressing F7 or selecting Project?Make. If compilation is successful, output files named hextoasc.hex and hextoasc_d.hex will be generated along with a list file. You are now ready to run the application.
Step 10: Before executing the application, set some break points to investigate the application's behavior. Click on the line number at the left edge of the editor window to set a breakpoint. The breakpoint will be indicated by a • to the side of the number. Set a break point on the line below "main," and another at the subroutine, Hex2Asc. Press F5 to start the simulator. This will save the files (if not already saved) and compile the project. If the compilation is successful, the simulator will load the file and start running. When the simulator hits a break point, the program execution will pause at the current line, as indicated by highlighting of the current line and a → mark to the left of the margin.
Figure 5 shows the breakpoint and an instance of the application running.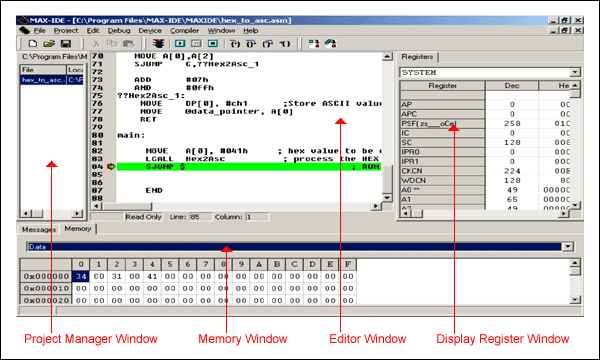
Figure 5. The Debug Windows with the breakpoint indicated by the green arrow and line.
Step 11:Open up the registers window by clicking on Window→Show→Registers from the Window menu. Select SYSTEM from the Registers drop-down box to display the MAXQ core registers' contents. Observe that relevant registers are updated as you step through the execution. Try the commands step into, step over, step out, and run to cursor to become familiar with the MAX-IDE. Similarly, if your program is writing to the data memory and you want like to watch the data values, go to Window→Show→Memory, tab to "data" memory, and scroll down to the memory location to observe the values.
The above program converts the hex value supplied in the A [0] register to its equivalent ASCII value, and stores the ASCII values in the data memory addresses 0x00 and 0x02.
Execute the application for different values in the A [0], and observe their equivalent ASCII values in data memory addresses 0x00 and 0x02.
Refer back to Figure 4. A [0] is set to 0x41 HEX in the registers window; data memory location 0x00 and 0x02 are updated with 0x34 and 0x31 respectively, which are the ASCII equivalent of 0x41 hex.
Step 12: Open the Statistics window (Window→Show→Statistics). This action shows you the machine cycles and execution time (Figure 5).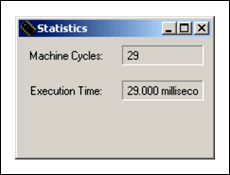
Figure 6. The Statistics window lets you monitor machine cycles and execution time.
Conclusion
MAX-IDE, the MAXQ device simulator, can be used to develop and debug the MAXQ-based applications for the MAXQ10, MAXQ20, and MAXQ30 devices. The application developed with MAX-IDE is ready to run on the hardware.
Appendix: Table of MAX-IDE Useful Commands
| New File... | Open a new text/source file. |
| Open File... | Open an existing source file. |
| Save | Save the edited file. |
| Save As... | Save the newly edited file and give it a name. |
| Close | Close the source file. |
| Print... | Print the source file. |
| Exit | Exit from the IDE. |
| New Project | Create a new project. |
| Open Project | Open an existing project. |
| Save | Save the already opened project. |
| Save Project As... | Save the newly created project and give it a name. |
| Close | Close the project. |
| Add Files... | Add source files to the project. |
| Remove File | Remove the source file from the project. |
| Make | Compile the modified source file. |
| Build All | Compile all the source files in a project. |
| Undo | Undo the latest changes. |
| Cut | Delete the selected text and keep it in clipboard. |
| Copy | Copy the selected text into a clipboard. |
| Paste | Paste the text from clipboard to the position pointed to by buffer. |
| Delete | Delete the selected text. |
| Select All | Select all the text in the editor. |
| Find | Find the text in the source file. |
| Find Next | Find the next occurrence of the text in a source file/project. |
| Replace | Replace the text. |
| Find in Files | Find the text in the project directory. |
| Goto Line | Go to the specified line in the source file. |
| Tab Options | Option to select the tab options. |
| Convert Tabs to Spaces | Option to convert the tabs to spaces. |
| Set Editor Font | Option to set the text font. |
| Toggle Break Point | Toggle a break point. |
| Run | Execute the application. |
| Pause | Pause the execution of application. |
| Stop | Stop the application. |
| Step Into | Single step execution. Step into the function and execute the current source line. |
| Step Over | Execute the current source line. |
| Step Out | Execute all the instructions of the present module and step out of the module. |
| Run To Cursor | Execute until the line pointed to by cursor. |
| High Level Debug | Not applicable. |
| Low Level Debug | Not applicable. |
| Make | Compile the modified source file. |
| Build All | Compile all the source files in a project. |
| MAXQ ICE | Enables connection with Emulator. |
| MAXQ JTAG | Enables connection with device through the JTAG. |
| MAXQ Simulator | Enables the Simulator. |
| Load | Load the hex file into the loader. |
| Options | Dialog box for choosing the device and other device settings such as CPU frequency, ring frequency, and alternate clock for timer2. |
| Install Device | Install a specified MAXQ device DLL into the IDE. |
| Remove Device | Remove the device from the list of devices. |
| Show→Breakpoints | Display a list of break points in a project. |
| Show→Find in Files | Display a list of files where a specified text is found. |
| Show→Memory | Display memory window. Memory window contains Code, ROM and Data area. |
| Show→Message | Display message window. |
| Show→Project | Display project window. |
| Show→Register | Display register window. |
| Show→Statistics | Display statistics window. |
| Contents | Display the contents of a help file. |
| Help | Display the version of the IDE and its components. |

加入微信
获取电子行业最新资讯
搜索微信公众号:EEPW
或用微信扫描左侧二维码